Monday 27 June 2011

Remove email account at the back end.

Unable to delete an email account from cPanel 

The e-mail address admin@mydomain.com deleted successfully.
Sorry, you do not have access to the domain mydomain.com

The error message is displayed when you delete an email account of a domain from cPanel >> ‘Email Accounts’ that is either shifted under another users account OR usually happens when a domain is swapped from add-on domain to main domain OR vice-versa. You cannot delete an email account from cPanel, and in this case, you have to manually remove the email account entries for domain from the existing account.

The files you need to remove the entries from are

/home/user/etc/domainname.tld/passwd
/home/user/etc/domainname.tld/shadow
/home/user/.cpanel/email_accounts.yaml


The directory that need to be removed is

  /home/user/mail/mydomain.com/user

Note: 'user' is the one who owns the domain "mydomain.com"

Add IP module in VZCTL

HowTo: Add iptable modules on a VPS

If you receive the following error on restating iptables on a VPS:

error message: from firewall software ~ iptables: Unknown error 4294967295
 
You need to make sure the required iptable modules are loaded in the host server kernel. You have to use modprobe to load the following modules in the kernel:

modprobe ipt_MASQUERADE
modprobe ipt_helper
modprobe ipt_REDIRECT
modprobe ipt_state
modprobe ipt_TCPMSS
modprobe ipt_LOG
modprobe ipt_TOS
modprobe tun
modprobe iptable_nat
modprobe ipt_length
modprobe ipt_tcpmss
modprobe iptable_mangle
modprobe ipt_limit
modprobe ipt_tos
modprobe iptable_filter
modprobe ipt_helper
modprobe ipt_tos
modprobe ipt_ttl
modprobe ipt_REJECT


Once the modules are loaded, add the modules to your VPS using the vzctl command. You will have to stop the VPS first

vzctl stop VEID

and then add the modules to a VPS

vzctl set VEID –iptables ipt_REJECT –iptables ipt_tos –iptables ipt_TOS –iptables ipt_LOG –iptables ip_conntrack –iptables ipt_limit –iptables ipt_multiport –iptables iptable_filter –iptables iptable_mangle –iptables ipt_TCPMSS –iptables ipt_tcpmss –iptables ipt_ttl –iptables ipt_length –iptables ipt_state –iptables iptable_nat –iptables ip_nat_ftp –save

Once the above command is executed, start the VPS

vzctl start VEID

Now you are set to use iptables on your VPS.

.htaccess Redirection.

.htaccess Redirection to domain

.htaccess Redirection.

How to redirect a website using .htaccess?

Redirect website http://mydomain.com to http://www.mynewdomain.com
RewriteEngine on
RewriteCond %{HTTP_HOST} ^mydomain\.com$
RewriteRule ^(.*)$ http://www.mynewdomain.com [R=301,L]


Redirect website mydomain.com with and without www requests to http://www.mynewdomain.com
RewriteEngine on
RewriteCond %{HTTP_HOST} ^www\.mydomain\.com$ [OR]
RewriteCond %{HTTP_HOST} ^mydomain\.com$
RewriteRule ^(.*)$ http://www.mynewdomain.com [R=301,L]


Redirect requests from http://mydomain.com to http://mydomain.com/subdirectory i.e. redirecting requests from main domain to a sub-directory.
RewriteEngine on
RewriteCond %{HTTP_HOST} ^www\.mydomain\.com$ [OR]
RewriteCond %{HTTP_HOST} ^mydomain\.com$
RewriteRule ^(.*)$ http://www.mydomain.com/subdirectory/ [R=301,L]


Redirect all http (80) requests of a domain to https (443) i.e. redirecting requests from non-secure port to a secure port.
RewriteEngine On
RewriteCond %{SERVER_PORT} !443
RewriteRule ^(.*)$ https://mydomain.com/$1 [R,L] 

Friday 24 June 2011

Nagios installation.

How to install NAGIOS in linux or windows server?

Solution.

INSTALLATION

Download the latest version of nagios from the following link
http://www.nagios.org/download/
Then, unpack the Nagios distribution, use the following command
#tar xzf nagios-2.6.tar.gz
Navigate  to the newly created directory
#cd nagios-version (nagios-2.6)
Run the configure script
# ./configure --prefix=/usr/local/nagios --with-cgiurl=/nagios/cgi-bin --
with-htmurl=/nagios/ --with-nagios-user=nagios --with-nagios-
group=nagios --with-command-group=nagios

where
--prefix=/usr/local/nagios is the Nagios root folder
--with-cgiurl=/nagios/cgi-bin is the Nagios CGI folder
--with-htmurl=/nagios/ is the Nagios HTML/Website folder
--with-nagios-user=nagios is the Nagios user
--with-nagios-group=nagios is the Nagios group
--with-command-group=nagios is the Nagios command group which has
webserver user (Apache) and the nagios user as members.
If we want more options just type the following command
#./configure --help

#make all
this will Compile Nagios and the CGIs
#make install
This will Install the binaries and HTML files (documentation and main
web page)
#make install-init
This will install the Startup scripts(to /etc/rc.d/init.d/nagios)
# make install-commandmode
This will Create the required directory for command file and assign
appropriate permissions to it for the external commands.
# make install-config

This installs SAMPLE config files in /usr/local/nagios/etc .We' 'll have to
modify these sample files before we can use Nagios.
This will complete the installation Now we need to know the Directory
Structure and File locations. After navigating to  /usr/local/nagios , we
would see 5 sub-directories:
* bin/ Nagios core program
* etc/ Main, resource, object, and CGI configuration files should be put
here
* sbin/ CGIs
* share/ HTML files (for web interface and online documentation)
* var/ Empty directory for the log file, status file, retention file,etc.

Next thing we need to concentrate is /usr/local/nagios/etc directory
where all the sample configuration files like nagios.cfg-sample,cgi.cfg-
sample stores.
So, we need to rename these sample configuration files to .cfg files.
Hence, the basic installation of nagios is completed.

INSTALL NAGIOS PLUGINS:

Plugins are usually installed in the libexec/ directory of your Nagios
installation (i.e. /usr/local/nagios/libexec).
a) Download Nagios Plugins
b) Untar the downloaded file and navigate to nagios plugin dir.
c) ./configure and make && make install
This should install the plugins in the /usr/local/nagios/libexec directory.


SETTING UP THE WEB INTERFACE FOR NAGIOS:

1) Create configuration entries for nagios in httpd.conf
2) Restart Apache
3) Setup User Authentication:  This can be done by,
# htpasswd -c /usr/local/nagios/etc/htpasswd.users nagiosadmin

Enter the required password when prompted. This will setup htaccess
on the site by creating a new file named htpasswd.users under
/usr/local/nagios/etc/ with the first user nagios admin.
You can add as many user you wish by
# htpasswd /usr/local/nagios/etc/htpasswd.users (username)

For the CGIs to use Authentication on Nagios, edit the file
/usr/local/nagios/etc/cgi.cfg and set  “use_authentication=1”

You can now access the web interface at http://<IPADDRESS OR
HOSTNAME>/nagios/


NAGIOS CONFIGURATION:

Main Configuration file:  nagios.cfg
Resource File: resource.cfg
Commands Config File: commands.cfg

Other Object Configuration files are:
 hosts.cfg
 hostgroup.cfg
 services.cfg
 servicegroup.cfg
 contacts.cfg
 contactsgroup.cfg
 timeperiod.cfg

Syntax Check and Nagios Reload:
/usr/local//nagios/bin/nagios -v /usr/local//nagios/etc/nagios.cfg
/etc/rc.d/init.d/nagios reload


HOSTS.CFG

define host{
        host_name               my-host
        alias                   my-host.domain.ac.uk
        address                 168.192.0.1
        check_command           check-host-alive
        max_check_attempts      10
        check_period            24x7
        notification_interval   120
        notification_period     24x7
        notification_options    d,r
        contact_groups          unix-admins
        register                1
        }


SERVICES.CFG

     define service{
     name                            ping-service
     service_description             PING
     is_volatile                     0
     check_period                    24x7
     max_check_attempts              4
     normal_check_interval           5
     retry_check_interval            1
     contact_groups                  unix-admins
     notification_options            w,u,c,r
     notification_interval           960
     notification_period             24x7
     check_command    check_ping!100.0,20%!500.0,60%
     hosts                           my-host
     register                        1
     }


HOSTGROUPS.CFG

# 'hong-kong' host group definition
define hostgroup{
hostgroup_name hong-kong
alias Hong Kong Group
contact_groups hk-admins*
members HK1,HK2
}

# 'new-york' host group definition
define hostgroup{
hostgroup_name new-york
alias New York Group
contact_groups ny-admins*
members NY1,NY2
}


NAGIOS LOG FILES

Nagios.log
Status Log:  nagios/var/status.log
Downtime Log File:  nagios/var/downtime.log
Comment log File: nagios/var/comment.log
Nagios Lock File: nagios.lock => Nagios creates this file when it runs as
a daemon. This file contains the process id (PID) number of the running
Nagios process.
State Retention File: nagios/var/status.sav                              This
is the file that Nagios will use for storing service and host state
information before it shuts down. When Nagios is restarted it will use the
information stored in this file for setting the initial states of services and
hosts before it starts monitoring anything.


NAGIOS DEFAULT PLUGINS

Some of the common plugins installed by default with installation of
Nagios are:
check_by_ssh: execute a command on a remote host using SSH
check_disk: check the percent of used disk space on a mounted file
system and generate an alert if percentage is above one of the threshold
values.
check_dns: uses the nslookup program to obtain the IP address for the
given host/domain query.
check_ftp: tests FTP connections with the specified host.
check_http: tests the HTTP service on the specified host.
check_load: tests the current system load average.
check_ping: Use ping to check connection statistics for a remote host.
check_pop: This plugin tests POP connections with the specified host.
check_smtp:  tests the SMTP service on the specified host.
check_time:  Checks time on the specified host.
check_imap : Tests the IMAP connections with the specified host.

NAGIOS EVENT HANDLER

- optional commands that are executed whenever a host or service state
change occurs.
- ability for Nagios to proactively fix problems before anyone is notified
- logs service or host events to an external database.

Event Handlers are executed when a service or host is in a 'soft' state ,
initially goes to a 'hard state' or recovers from a soft or hard state.

E.g:
define service{
        host_name                       somehost
        service_description             HTTP
        max_check_attempts              4
        event_handler                   restart-httpd
        ...other service variables...
        }

===========================================
                       
                        Thank you :)

Wednesday 22 June 2011

Open VZ and commands


Introduction

====================
vz -> recommends ext3 file system
PIM -> IP:4643
PMC -> mangaing h/w node
PPP -> for managing a single container
All the above things need a license from parallel
====================

Templates

====================
OS template -> vzpkg (cache needs to created before creating the container)
EZ template -> points to the repository that contains packages that constitute the template
Application template -> mysql template
====================

To create a container

====================
vzctl create
the container ID > 100
32 -bit integer
ID - 0 -> h/w node
ID -1 -> service container

/etc/vz/conf -> for the sample file names (only use the main part of the file name)

vzctl set - configure the container
vzctl exec - run anything on the container
vzctl status/vzlist 101

vzpkg - for adding application templates on h/w node (/vz/templates)
- the same command can be used for installing/removing the template into a the container.

Virtuozzo - User's guide

OS virtualization - (1-2% of is spent on the virtualization s/w)
VZFS - allows sharing of common files among containers
Hardware node & Containers

/etc/vz/vz.conf
/etc/vz/conf/
/etc/vzbackup.conf

Standard migration
vzmigrate

Zero downtime migration
vzmigrate --online --require-realtime my_node.com 101

Move the container within the h/w node
vzmlocal

Backup & restore
vzabackup/vzarestore

Reinstall container
vzctl recover -> restores the VZFS symlinks
vzctl reinstall -> creates new private area for the container, copies the old private area to /old dir
- vps.configure, vps.reinstall

Delete the container
vzctl destroy

Disabling the container
vzctl set

Suspending the container
vzctl suspend

Setting up resources
disk quotas - first level(how much files or disk space the container can use) and second level (quotaugidlimit > no of entries in /etc/passwd or group files)
Container must be restarted to come this changes into effect

vzquota - to check the status of the quota info

Cleaning up containers - to move identical files from contrainers to /vz/template/vc folder
vzcache

Linking container files with application templates
vzpkg link
vzpkglink
vzpkgls

Managing CPU - cpu share and the number of processors the node can make use of.
vzcpucheck

Network traffic
/etc/vz/conf/networks_classes - after any changes, you need to service vz accrestart
class 0 - no accounting will be performed
class 1 - defined by containers to match any IP address
vznetstat

Bandwidth management (outgoing traffic)
service vz shaperon, shaperrestart, shaperoff
BANDWIDTH -> kilobites per second
TOTALRATE -> ::

For container
RATE -> ::
RATEBOUND -> to specify if the bandwidth is limited to the RATEBOUND
====================

Monitoring tools

====================
vzstat
vzps
vzpid
vztop
vzsetxinetd

Virtuozzo networks
vznetcfg if list

vznetcfg vlan add eth0 5
vznetcfg vlan del eth0.5

vznetcfg net addif vznetwork1 eth0
vznetcfg net delif eth0

vznetcfg net new vznetwork1
vznetcfg net del vznetwork1
vznetcfg net list

venet0 --?

License
vzlicload
vzlicupdate
vzlicview

Keeping system up2date
The h/w node can be updated using the normal update procedures without affecting virtuozzo
vzup2date - /etc/sysconfig/vzup2date/vzup2date.conf
vzup2date -m batch install --core
vzup2date -t -m batch install --all-os

Updating the containers
vzpkg update 101 redhat-el5-x86
vzpkg update 101
vzpkg update cache fedora-core-8-x86

Loading iptables modules
/etc/sysconfig/iptables-config
/etc/vz/vz.conf
/etc/vz/conf/.conf

VZFS-v2

Virtuozzo - Templates management guide

/vz/template
/vz/private/
/vz/root/

vzpkg - for managing VZ template
vzpkgls - for listing standard template

vzpkg install -p 110 yum

Virtuozzo - Managing UBC Resources

vzcfgvalidate

VE0CPUUNITS
SLM parameters

i-node setups

ext3 - 1 inode per every 4K

Plesk and MYSQL


1. Getting all the domain account information from Plesk
------------------------------------------------------------------------

mysql -uadmin -p`cat /etc/psa/.psa.shadow` -D psa -e "select
login,password,home from sys_users INNER JOIN accounts on
accounts.id=sys_users.account_id;"

2. Get client login details from Plesk.
-----------------------------------------------

mysql -uadmin -p`cat /etc/psa/.psa.shadow` -D psa -e "select
login,password from clients INNER JOIN accounts on
accounts.id=clients.account_id;"

3. Getting all mail account login information
--------------------------------------------------------

mysql -uadmin -p`cat /etc/psa/.psa.shadow` -D psa -e "SELECT
CONCAT_WS('@',mail.mail_name,domains.name) as email ,accounts.password
FROM domains,mail,accounts WHERE domains.id=mail.dom_id AND
accounts.id=mail.account_id ORDER BY domains.name ASC,mail.mail_name ASC;"

4. Creating/deleting/updating mail accounts using command line
---------------------------------------------------------------------------------

create mail account

/usr/local/psa/bin/mail -c USER@DOMAIN.COM -passwd PASSWORD -mailbox
true -cp-access true

update mail account

/usr/local/psa/bin/mail -u USER@DOMAIN.COM -passwd NEWPASS

remove mail account

/usr/local/psa/bin/mail --remove USER@DOMAIN.COM

5. Mailing list management
----------------------------------

creating mailing list

/usr/local/psa/bin/maillist --create MYLIST -domain DOMAIN.COM
-passwd_type plain -passwd PASS -notify false -email LISTADMIN@DOMAIN.COM

Adding/removing members to the mailing list.

/usr/local/psa/bin/maillist -u MYLIST -domain DOMAIN.COM -members
add:NEW@DOMAIN.COM

/usr/local/psa/bin/maillist -u MYLIST -domain DOMAIN.COM -members
del:NEW@DOMAIN.COM

Getting list members

/usr/local/psa/bin/maillist -i MYLIST -domain DOMAIN.COM

Removing list

/usr/local/psa/bin/maillist -r MYLIST -domain DOMAIN.COM

6. Managing databases.
------------------------------

create database

/usr/local/psa/bin/database --create DBNAME -domain DOMAIN.COM -server
localhost:3306 -add_user DBUSER -passwd PASS

remove database

/usr/local/psa/bin/database -r DBNAME

Sunday 12 June 2011

Install LiteSpeed in WHM

LiteSpeed installation in WHM. How to add the liteSpeed module or plugin in the cPanel WHM.

cd /usr/src
wget http://www.litespeedtech.com/packages/cpanel/lsws_whm_plugin_install.sh
chmod 700 lsws_whm_plugin_install.sh
./lsws_whm_plugin_install.sh
rm -f lsws_whm_plugin_install.sh

Login to WHM, "LiteSpeed Web Server Plugin for WHM" should show up in WHM "Plugins" section.
Now you can then install/manage LiteSpeed Web Server from WHM.

Install CloudLinuxOS in cpanel.

Install cloudlinuxOS in cpanel.

install cloudlinuxOS in cpanel.

How to install cloudlinuxOS in your shared server.

It is easy to switch cPanel server from CentOS 5.x to CloudLinux. The process takes a few minutes and replaces just a handful of RPMs.

1) Get <activation_key> either by getting trial subscription or by purchasing subscription
2) Download script: cpanel2cl
3) Execute sh cpanel2cl -k <activation_key>
If you bought CloudLinux license directly from cPanel, you don't need activation key. Just run
4) sh cpane2cl -k
5) Reboot

6) wget http://repo.cloudlinux.com/cloudlinux/sources/cln/cpanel2cl
7) sh cpanel2cl -k <activation_key>
8) reboot
9) /scripts/easyapache --build

Once you have rebooted, you are running CloudLinux kernel with LVE enabled.

Thursday 9 June 2011

ASSP spam filter in cpanel. useful commands.

These are the few useful path for ASSP spam filter set in the cPanel.


find the email: each time you need to analyze an email problem first check if the problem is on ASSP using commands like this
# tail -60000 /usr/local/assp/maillog.txt | grep "email" or
# tail -60000 /usr/local/assp/maillog.txt | grep "ip_address"
and , If the problem is not on ASSP then check the exim maillog with a command like this
# tail -60000 /var/log/exim_mainlog | grep "email" or
# tail -60000 /var/log/exim_mainlog | grep "ip_address"
You can monitor ASSP running in this way
# tail -f /usr/local/assp/maillog.txt
After the installation, and for the first 12/24 hours ASSP is running execute this often
# cd /usr/local/assp;/usr/bin/perl /usr/local/assp/rebuildspamdb.pl
/usr/local/assp/discarded
You can test if spambox is working in this way
# tail -f /var/log/exim_mainlog | grep "piping"

cPanel password - decrypt it

Hello,

Is there any way to decrypt "Cpanel password. I know that the cPanel user is listed in "/etc/passwd" and password is encrypted in the "/etc/shadow". If some one forgets the password the only option available is to reset the password. Is there any option to view the password without resetting it?

Solution:

Copy paste the script and run the script by changing the file permission to 755. This bash script used to decrypt the password.


#!/bin/bash
/*
* shadow.c - gcc -o shadow shadow.c
* run as root - shadow > passwd.file
*/
#include &lgt;pwd.h>
main()
{
struct passwd *p;
while(p=getpwent())
printf("%s:%s:%d:%d:%s:%s:%s\n",
p-> pw_name, /* account name */
p-> pw_passwd, /* hash */
p-> pw_uid, /* user id */
p-> pw_gid, /* group id */
p-> pw_gecos, /* gecos field */
p-> pw_dir, /* home dir */
p-> pw_shell); /* shell (typically) */
}

PHP info page is not working

Hello,

In my VPS, PHP info page is not working. Its not showing changes when I do modifications. Please help me to fix the issue.?

Solution:

1)Copy /usr/local/cpanel/cgi-sys/php5.cgi to /home/username/ public_html/cgi-bin

2)Add the below given script

root [/home/username/public_html/cgi-bin]# vi phpini.cgi
#!/bin/sh
export PHPRC=/home/username/public_html
exec /home/username/public_html/cgi-bin/php5.cgi

3)And added a php.ini in the location (/home/username/public_html)

4)In the .htaccess put the following.

AddHandler php-cgi .php
Action php-cgi /cgi-bin/phpini.cgi

5) Permission of phpini.cgi should be 755


6) Now check the PHP page in your browser.

Exim mail server - commands

Hi,

Please give me a brief on the various Exim commands

Solution:

Exim commands
1) To delete mails in the mail queue older than a day
exiqgrep -o 86400 -i | xargs exim -Mrm

2)exim -bp|grep $name Will show the mail in queue for $name
exim -Mvh $MSGID View message header
exim -Mvb $MSGID View message body
exim -M $MSGID Force delivery of message
exim -v -M $MSGID View the transact of message

3)Force delivery of one message
exim -M email-id

4)Force another queue run
exim -qf

5)Force another queue run and attempt to flush the frozen message
exim -qff

6)View the log for the message
exim -Mvl messageID

7)View the body of the message
exim -Mvb messageID

8)View the header of the message
exim -Mvh messageID

8)Remove message without sending any error message
exim -Mrm messageID

9)Giveup and fail message to bounce the message to the Sender
exim -Mg messageID

10)How much mail in the queue?
exim -bpr | grep "<" | wc -l


11)How many Frozen mails in the queue
exim -bpr | grep frozen | wc -l


12)Deleteing Frozen Messages
exim -bpr | grep frozen | awk {'print $3'} | xargs exim -Mrm


13)To find out, how many messages are there in the mail queue:
exim -bpc

14)To check the mails in the queue:
exim -bp

15)To force exim update:
/scripts/eximup --force

16)Sometimes from the message queue a lot of messages will be delivered even after the deletion of the particular mail id. In such cases, you can make use of this command to delete message from a particular user which is present in the message queue.

exiqgrep -i -f '' | xargs exim -Mrm


RVsitebuilder error in cPanel.

I am logging onto Cpanel fine but when trying to access RVsitebuilder i receive the following fatel error message.

Fatal error:
The encoded file /var/cpanel/rvglobalsoft/rvsitebuilder/www/ionctestlicense.php requires a license file.
The license file /var/cpanel/rvglobalsoft/rvsitebuilder/rvsitebuilder.lic has expired. in Unknown on line 0


I have no idea what this means can anyone help? Or could anyone point me to the right place to get help?


Solution:


You just need to execute the following commands from SSH to resolve this issue.

rm -f /var/cpanel/rvglobalsoft/rvsitebuilder/var/INSTALL_COMPLETE.php
rm -f /var/cpanel/rvglobalsoft/rvsitebuilder/rvsitebuilderversion.txt
perl /usr/local/cpanel/whostmgr/docroot/cgi/rvsitebuilderinstaller/autoinstaller.cgi


Monday 6 June 2011

Light speed installation in cPanel

Linux, Windows, PHP, MySQL, cPanel, Plesk , etc and their fixes (Under updates): Light speed installation in cPanel

Litespeed installation in cPanel

    Apache is the one of the best web server used by all the Web hosting company. As the days passed on, all the customers need double the speed of Apache. So wat can be the solution.

Sol: LITE SPEED. Apache + Apache = Light speed.

Follow the link to know about LiteSpeed. "http://www.litespeedtech.com/"

How to install Lite Speed?

INSTALLATION:


Download LiteSpeed

Now we need to download the LiteSpeed web server. This walk-through will cover installation of the free Standard Edition.

To download the software you will need to do the following:
  • Visit the LiteSpeed download page
  • Scroll down to LiteSpeed Web Server Standard Edition: Free
  • Download the file associated with Linux (x86)
  • Transfer the file to your Cloud Server (not covered in this tutorial)

Another option is to copy the direct link and download the file manually on your Cloud Server. For purposes of demonstration we will show you this option. The link below was valid at the time of writing and may have changed -- please adjust accordingly.
# cd ~
# wget http://www.litespeedtech.com/packages/4.0/lsws-4.0.3-std-i386-linux.tar.gz
You will see the wget utility appear and it will download the file. Once it has finished you will be returned to the prompt.

Installing LiteSpeed

We need to unpack the LiteSpeed package that we downloaded. Type the following command to unpack: (note that your file name may be different)
# sudo tar -zxvf lsws-4.0.3-std-i386-linux.tar.gz
Now we need to enter the directory that we extracted the files into:
# cd lsws-4.0.3
We are now ready to start the installer. Type the following command to start the installer:
# sudo ./install.sh
You will be prompted with a license agreement. Read the agreement and press the space bar multiple times until you reach the end.
After you 'space' through the license you will be prompted with the following:
IMPORTANT: In order to continue installation you must agree with above 
           license terms by typing "Yes" with capital "Y"! 

Do you agree with above license? 
Type Yes at this point and press Enter. Note that you *must* put a capital Y.

The next screen that appears will ask you what directory you would like to install LiteSpeed. The default directory is sufficient. Simple press Enter to accept the default.
Please specify the destination directory. You must have permissions to 
create and manage the directory. It is recommended to install the web server 
at /opt/lsws, /usr/local/lsws or in your home directory like '~/lsws'.

ATTENTION: The user 'nobody' must be able to access the destination
           directory.

Destination [/usr/local/lsws]: 

The next prompt will ask you for the administrative login that you would like to use for the administrative console. Simply press Enter to accept the default.
Please specify the user name of the administrator.
This is the user name required to log into the administration web interface.

User name [admin]: 

Enter the password that you'd like to use for administering your web server. Please make sure this is secure as it has the power to stop your server! Press Enter once you have entered it.
Please specify the administrator's password.
This is the password required to log into the administration web interface.

Password: 
Retype the password again.

Enter an e-mail address for the server administrator. This will be displayed on error messages so the server administrator may be contacted in the event of server failure.
Please specify administrators' email addresses.
It is recommended to specify a real email address,
Multiple email addresses can be set by a comma 
delimited list of email addresses. Whenever something
abnormal happened, a notificiation will be sent to 
emails listed here.

Email addresses [root@localhost]: 

Next you will be prompted for the user that the web server should run as. Leave it the default user of nobody and press Enter.
As you are the root user, you must choose the user and group
whom the web server will be running as. For security reason, you should choose
a non-system user who does not have login shell and home directory such as
'nobody'.

User [nobody]: 

You will be asked for the group next. Press Enter.
Please choose the group that the web server running as.

User 'nobody' is the member of following group(s):  nobody
Group [nobody]: 

Next you will be prompted for the port that the web server should answer on. Default HTTP traffic is port 80. Because the default port that the server selects is not correct, type in 80 and press Enter.
Please specify the port for normal HTTP service.
Port 80 is the standard HTTP port, only 'root' user is allowed to use 
port 80, if you have another web server running on port 80, you need to
specify another port or stop the other web server before starting LiteSpeed
Web Server.
You can access the normal web page at http://<YOUR_HOST>:<HTTP_PORT>/

HTTP port [8088]: 80

You will be prompted for the port that the administrative control panel should answer on. We will select the default port of 7080. Simply press Enter.
Please specify the HTTP port for the administration web interface,
which can be accessed through http://<YOUR_HOST>:<ADMIN_PORT>/

Admin HTTP port [2086]: 

You will be asked if you would like to install PHP support. For our demonstration we will turn on PHP support. Type Y and press Enter.
You can setup a global script handler for PHP with the pre-built PHP engine
shipped with this package now. The PHP engine runs as Fast CGI which  
outperforms Apache's mod_php. 
You can always replace the pre-built PHP engine with your customized PHP 
engine.

Setup up PHP [Y/n]: Y

You will then be asked for the default PHP extension. Select the default PHP and press Enter.
Suffix for PHP script(comma separated list) [php]:

Next you will be prompted to install AWStats, a web-traffic logger. For our demonstration we have chosen to not install it. Press N and then press Enter.
AWStats is a popular log analyzer that generates advanced web server 
statistics. LiteSpeed web server seamlessly integrates AWStats into 
its Web Admin Interface. AWStats configuration and statistics update
have been taken care of by LiteSpeed web server.

Note: If AWStats has been installed already, you do not need to
      install again unless a new version of AWStats is available.

Would you like to install AWStats Add-on module [y/N]? N

A large amount of text will pass (please read!) and then you will be prompted if you would like LiteSpeed to start automatically. Press Y and then Enter.
Would you like to have LiteSpeed Web Server started automatically
when the server restarts [Y/n]? Y

If that step completes successfully you will be asked if you would like to start LiteSpeed now. Press Y and then press Enter.
[OK] The startup script has been successfully installed!
Would you like to start it right now [Y/n]? Y

If the server starts successfully you will be given an output that looks similar to the one below:
[OK] lshttpd: pid=4517.

LiteSpeed Web Server started successfully! Have fun!

Testing LiteSpeed

Open up your web-browser and point it to your Cloud Server's IP address (or domain name if you have DNS setup). You should see something like the following:
litespeed_test.png

If you receive a similar screen then you have successfully installed LiteSpeed! Be sure to check out your administrative control panel at http://12.34.56.78:2086/. Change 12.34.56.78 to your IP address. If you changed the administrative port number you will have to change that as well.


--Hemanth Kumar N


Apache with PHP "Zend Phase error"

Apache with PHP.

Source installation of apache with PHP.


Notes.
> If you try to install php-5.3 you will end up with "Zend parse error". Please try to install
PHP-5.2 or lower.

> Please check whether you have installed 'gcc' and 'Mysql' and also ensure that Mysql is running.

Please follow the steps bellow to install Apache with PHP

 ===================

Compilation Process

Login as root to follow these steps.
As I earlier said, we are going to build PHP as Apache 2 shared module. Apache provides a facility to extend its functionality using separate modules. When PHP is compiled as Apache shared module its object code is not included in httpd binary. Instead, it works as a separate module which can be loaded by Apache and can also be disabled.

Compiling Apache

Using shell, (or open a new virtual console window if working in X Windows) change to directory where you have downloaded Apache 2 source. In my case it is /usr/src.
$ cd /usr/src
{Note} Beginners please note that $ is the just shell prompt symbol and it shouldn't be typed. It is used just to show that these lines should be typed at shell prompt.
Then we have to extract Apache source code from compressed httpd-2.0.44.tar.gz. To decompress this file use:
$ gunzip httpd-2.0.44.tar.gz or gzip -d httpd-2.0.44.tar.gz or
$ wget http://httpd.apache.org/download.cgi#apache20

Now you will have a new file named httpd-2.0.44.tar in your current directory. Now to extract its contents use:
$ tar -xvf httpd-2.0.44.tar

Both above steps can be completed with a single command:
$ tar -zxvf httpd-2.0.44.tar.gz
A new directory httpd-2.0.44 will be created in your current directory. For me it is /usr/src/httpd-2.0.44.
Now change to this directory:
$ cd /usr/src/httpd-2.0.44

Now we have to configure apache for compilation.
Configure Script
Almost every software which comes with its source code contains a configure script, which performs many checks and then prepares software for compilation. For example, it checks which kind of compiler is available and whether required libraries are installed or not. It also enables us to customize software according to our requirements. For example, we can specify where software will be installed.

Name of this script is normally configure. Apache also provides a configure script file named configure in its source directory (/usr/src/httpd-2.0.44 in my case). Using this script we can decide where Apache will be installed and which optional modules we want to compile etc. There are many options which can be supplied to configure. To see a list of options supported by configure, type:
$ ./configure --help

It will show a complete list of all options supported by the version of Apache that you have downloaded.
These options normally start with a "--with-xxx" and "--enable-xxx" and are separated by space. Where xxx is the name of the option like --enable-so (for apache configure script) and --with-mysql (for PHP configure script). Options we will be using for Apache are --prefix and --enable-so.
Execute this command in the Apache source directory:
$ ./configure --prefix=/wwwroot --enable-so
First option --prefix tells configure script that we want Apache to be installed in directory /wwwroot. If we don't provide a prefix option than it'll be installed in default location, which is /usr/local/apache2.
I am installing everything in /wwwroot because:
  1. when a new version of PHP and Apache is released, I only have to rename /wwwroot directory to some other name like /wwwrootold and then I can install new versions in /wwwroot directory again. If new installation works properly then I can simply copy configuration files from old directory to /wwwroot.
  2. users new to compiling software from source, after compiling and installing it, try to find a way to uninstall the software. So, benefit of keeping everything at one place is; if someone wants to uninstall Apache and PHP then he just has to delete /wwwroot directory (After stopping Apache, if it is running).
Second option --enable-so tells configure to enable module so, which allows Apache to load shared modules. We need this option because we are compiling PHP as Apache shared module.
Example Apache configure command line looks like this. After configure finishes we have to compile Apache.
make
To compile Apache a utility called make is used. make reads a file named Makefile in the source directory. In the Makefile step by step instructions are written about how to compile the software. Benefit of using make is that if some of the source files are changed and we compile software again, then only files which are changed and files which depend on changed files are recompiled.
To compile Apache source we have to issue this command in the Apache source directory (/usr/src/httpd-2.0.44):
$ make

When you type make It will start compiling Apache. It will take several minutes depending upon the speed of your computer. After make finishes, shell prompt is available. Now source has been compiled. We will use make install command to install Apache
$ make install

This will install Apache to /wwwroot directory. Now test your Apache installation by starting Apache:
$ /wwwroot/bin/apachectl start

If you are returned to shell prompt and no error etc. is displayed then Apache is started.
Now you can open a web browser like lynx and visit Apache homepage:
$ lynx http://localhost

It'll show Apache homepage, where you can read Apache documentation to know more about Apache.
To stop Apache you can use:
$ /wwwroot/bin/apachectl stop
Back to Top

Compiling PHP

Change to directory where you have downloaded PHP source.
$ cd /usr/src

Then we have to extract PHP source files from php-4.3.0.tar.gz file.
To decompress the compressed file use:
$ gunzip php-4.3.0.tar.gz or
$ wget http://www.php.net/get/php-5.2.17.tar.gz/from/a/mirror

Note: you can choose any version that is compatible with your "cat /etc/redhat-release". You can download PHP from "  http://php.net/downloads.php". The concept of installation is same.

You will have a file named php-4.3.0.tar in your current directory. Now to extract its contents use:
$ tar -xvf php-4.3.0.tar

Both above steps can be completed by using this command:
$ tar -zxvf php-4.3.0.tar.gz
A new directory php-4.3.0 will be created in your current directory. For me its /usr/src/php-4.3.0.
Now change to this directory:
$ cd /usr/src/php-4.3.0

Now we have to configure PHP for compilation process. There are hundreds of options which can be provided to configure script. These options include the option to specify where PHP should be installed, which functionality should be enabled, like functionality to access mysql databases from PHP and which extensions have to be compiled etc. To see a list of options supported by PHP configure, type:
$ ./configure --help

It'll show a list of all options supported by the version of PHP that you are using.
Extensions provide additional functionality which core PHP doesn't provide. For example to create images --with-gd option can be used. But for these extensions to work, appropriate libraries must have been installed. If you use some --with option and that library isn't installed on your system then configure will fail. So, my advice is, for the first time don't try to use any extension.
To compile PHP as Apache shared module we have to provide path to apache apxs utility, which in our case was installed in /wwwroot/bin/ when we installed Apache. So, in PHP source directory (/usr/src/php-4.3.0) execute this command :
$ ./configure --prefix=/wwwroot/php --with-apxs2=/wwwroot/bin/apxs --with-config-file-path=/wwwroot/php --with-mysql

First option --prefix=/wwwroot/php tells configure script that we want PHP to be installed in /wwwroot/php directory. Otherwise it'll be installed in some default location (/usr/local).

Second option --with-apxs2 specifies that we want to install PHP as Apache 2 shared module.

Third option --with-config-file-path specifies that PHP should look for php.ini file in /wwwroot/php directory. Php.ini file contains various settings, which can be used to configure PHP after it has been installed. Settings like path to directory where php extensions are installed. Options like max_execution_time in php.ini specifies maximum time a script is allowed to run before it is terminated by PHP parser.
{Note} You don't have to specify name of the php.ini file when using --with-config-file-path option. Only directory path where php.ini file will be stored has to be specified. So, don't use --with-config-file-path=/wwwroot/php/php.ini, but instead use --with-config-file-path=/wwwroot/php.
Fourth option --with-mysql enables support to access mysql databases through PHP. After --with-mysql we can optionally specify directory where mysql is installed like --with-mysql=/usr/local/mysql. To use mysql database functions you must have mysql database installed on your system. If you don't have mysql installed you can remove this option. If this option is not used then library, which is bundled with PHP is used to access mysql databases.
Example PHP configure command line looks like this.
After configure finishes. You have to type make to compile PHP:
$ make

It will take several minutes to compile. After make finishes and, no error etc. is displayed then PHP has been compiled successfully. If any warning is displayed then, normally, you can ignore it.
After this, if Apache is running stop Apache:
$ /wwwroot/bin/apachectl stop
Now you can execute make install from within PHP source directory to install PHP to /wwwroot/php directory:
$ make install
make install will install PHP4 module to Apache's modules sub-directory (/wwwroot/modules) and add a line like this:
LoadModule php4_module modules/libphp4.so

to apache configuration file (/wwwroot/conf/httpd.conf). This line allows Apache to automatically load PHP module when Apache starts. If this line is not added by PHP install, which in my case wasn't,  then you can add it yourself. To add this line yourself, search for a word LoadModule in /wwwroot/conf/httpd.conf file. This word will be somewhere under section "Dynamic Shared Object (DSO) Support". Under this section, on a new line, add the above line.
{Note} All lines that start with a # are comments and are ignored by Apache.
Now you have to add another line to this httpd.conf file so that Apache invokes PHP parser whenever a file with extension php (.php) is accessed. When PHP parser is invoked by Apache it reads .php file which contains PHP code blocks, html tags and other text. Parser then executes PHP code found inside <?php and ?> blocks and then merges PHP code results and other html content (as is). Resulting output is then sent back to Apache which in turn sends it to web browser which requested the file.
The line to be added is:
AddType application/x-httpd-php .php
To add this line search for word AddType in httpd.conf file. There will be a line like this:
AddType application/x-tar .tgz
Below this line add (on a new line):
AddType application/x-httpd-php .php
{Note} If you are unable to find any AddType line, then add the above line at the end of the file.
{Note} With Apache 2_0_28-beta line to be added at the end of httpd.conf file was: <Files *.php>
SetOutputFilter PHP
SetInputFilter PHP
</Files> 

But with Apache 2.0.44 AddType syntax has to be used.
You can add any file extension in addition to .php if you want to invoke PHP parser for any other file extension also. Like: AddType application/x-httpd-php .phtml
will invoke PHP parser whenever any file with phtml extension (.phtml) is accessed.
Save this file and then start Apache:
$ /wwwroot/bin/apachectl start
If no error message is displayed and everything is fine, Apache is started and you are returned to shell prompt.
{Note} With version 2.0.43 / 2.0.44 of Apache I have noticed a small problem. When you are experimenting with various PHP settings and trying to stop and start Apache again and again, then sometimes when you stop Apache all httpd processes are not stopped. Then if you try to start Apache again it displays error message like port is already used etc. and it doesn't start. It happens only sometimes and not always. To solve this problem you have to manually kill that httpd process, using its process id (pid). To see the pid of that httpd process you can use:
ps -A
it will display processes that are running. If there is any httpd process in the list displayed, then note its pid and then use:
kill -9 <pid>
replace <pid> with the actual process id of the httpd process. Also sometimes more than one httpd processes are displayed and you have to kill all httpd process otherwise you won't be able to start Apache.
Back to Top

Testing the PHP Installation

Now create a PHP file named info.php, using any editor like vi or emacs, in the /wwwroot/htdocs directory and enter three lines, shown below, in this file. Directory /wwwroot/htdocs is Apache root directory. Apache publishes all files present in this directory to web users. This directory can be changed by editing httpd.conf file and changing DocumentRoot value to some other directory.

info.php
<?php
phpinfo();
?>


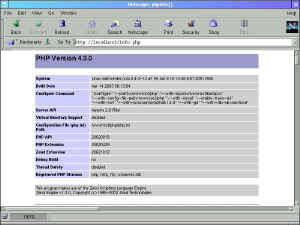
Save this file and then access this file using a web browser like lynx or Netscape Navigator by entering a url like this:
http://localhost/info.php
If PHP was installed successfully a page, shown in the image below, will be displayed containing detailed information about your PHP installation, Apache environment and PHP extensions loaded etc.
Screenshot of result of info.php. Click to enlarge.
Click for a larger image.
Now you can copy /usr/src/php-4.3.0/php.ini-dist to /wwwroot/php/ directory as php.ini.
{Note} Default location of php.ini is <installpath>/lib (if not changed at compile time using --with-config-file-path option).
$ cp /usr/src/php-4.3.0/php.ini-dist /wwwroot/php/php.ini
You can change your PHP settings by editing php.ini file. For information about php.ini and its different settings see http://www.php.net/manual/en/configuration.html.

Now restart apache:
$ /wwwroot/bin/apachectl restart

Back to Top

Enabling some PHP extensions

If you are feeling comfortable about compiling PHP and Apache and everything is working fine then you can enable some PHP extensions or use some other configure options. First you have to run PHP configure script again and add relevant --with-xxx or --enable-xxx option, where xxx is the name of the extension or option you want to enable. For a list of core configure options supported by PHP see http://www.php.net/manual/en/configure.php. To find out all configure options supported by version of PHP source code that you have downloaded, you have to run ./configure --help in your PHP source directory. It will display a list of all the configure options supported by that PHP version. As I already said, for any extension to work its library must have been installed otherwise configure will fail. These extensions just provide an interface to the actual library. Then, after stopping Apache, you'll have to run make followed by make install again in PHP source directory.

For example if you want to create images using PHP, you first need to install gd library using RPMs or by compiling from source. Then you can use --with-gd option to enable gd support from PHP like this:
$ ./configure --prefix=/wwwroot/php --with-apxs2=/wwwroot/bin/apxs --with-config-file-path=/wwwroot/php --with-gd
{Note} GD depends on some other libraries to create images in different formats. So, some other libraries like png, jpeg , zlib also have to be installed.
PHP configure will try to find directory where gd and other libraries and their header files are installed by searching some default library and include paths, like /usr and /usr/local. Header files are normally found inside include directory, like /usr/local/include, and library files are found inside lib directory e.g. /usr/local/lib. If configure is unable to find gd library then you can specify path where you installed gd library like this:
$ ./configure --prefix=/wwwroot/php --with-apxs2=/wwwroot/bin/apxs --with-config-file-path=/wwwroot/php --with-gd=/usr

If you compile gd from source then it'll be installed by default in /usr/local. There was no configure script provided with gd library I used, and I had to edit Makefile to change default install location.
Since PHP version 4.3.0, gd library is bundled with PHP distribution. This version of gd has support for some more image related features. PHP documentation suggests that this bundled version should be used in preference to the external gd library which you may install yourself.
So, if you are using PHP 4.3.0, you just have to use --with-gd option without specifying any path and PHP will use the bundled gd library. But not all libraries on which gd depends are bundled with PHP 4.3.0. So, you still need to install some other libraries like jpeg , png and zlib (for png) to create jpeg and png images with gd. In my case configure was unable to find zlib, so I had to use --with-zlib-dir=/usr/local option. More detailed information about installing this bundled gd library can be found here.

Back to Top

Conclusion

I think now you should feel comfortable about compiling software from source code. It is easy. Now you can download php manual from PHP documentation download page (http://www.php.net/download-docs.php) and start exploring PHP. If you faced problems when trying to compile PHP then you can subscribe to many related mailing lists (given below) and post your problems there.
Do tell me if you were able to compile PHP and Apache 2 from source after reading this information and whether you found this information useful. I do check each and every mail I receive and update this page according to any feedback provided. Also write to me if any links etc. don't work or about any other problem with this page.
===========


For more information please follow our link below.


+++++++++++++++++++++++++++++++++++++++++++++++++++++++++++++++++++++++++++
http://www.web-tech-india.com/articles/php/compiling_php_apache/
+++++++++++++++++++++++++++++++++++++++++++++++++++++++++++++++++++++++++++

Sunday 5 June 2011

Plesk Back end files

Plesk Back end files

Pleask backend files in linux machine:


Plesk root directory : /usr/local/psa

Version : /usr/local/psa/version

Admin password is stored : /etc/psa/.psa.shadow

Plesk configuration file : /etc/psa/psa.conf

Restart Plesk : /etc/rc.d/init.d/plesk restart

Apache

Main httpd configuration file : /etc/httpd/conf/httpd.conf

Plesk httpd : /etc/httpd/conf.d/zz010_psa_httpd.conf

Include conf files are under : /etc/httpd/conf.d (depends on the location specified in main httpd)

Startup script for plesk apache : /usr/local/psa/admin/bin/httpsdctl start

Apache main log files under : /var/log/httpd


PHP

Php configuration file : /etc/php.ini

Php extension modules are taken from : /etc/php.d


Named

Conf file located : /var/named/run-root/etc/named.conf

DB record : /var/named/run-root/var/domain.com

Log file : /var/log/messages

Service to restart : /etc/init.d/named restart


FTP


Conf file : /etc/proftpd.conf

Log file : /var/log/messages


Mysql


Databases are located at : /var/lib/mysql

Configuration file : /etc/my.cnf

Mysql log : /var/log/mysqld.log

Mail Server


Location of qmail directory : /var/qmail

Mail directory of a domain : /var/qmail/mailnames/domain.com

Mail log : /var/log/maillog or /usr/local/psa/var/log/maillog


Home directory of a domain

Home directory : /var/www/vhosts/domain.com

Httpd conf file of a domain : /var/www/vhosts/domain.com/conf/httpd.include

document root directory : /var/www/vhosts/domain.com/httpdocs

Document root directory of secure website : /var/www/vhosts/domain.com/httpdsdocs

Subdomains are created under : /var/www/vhosts/domain.com/subdomains

Domain specific logs are under : /var/www/vhosts/domain.com/statistics/ logs

==============================================

To log in to plesk use
https: :8443

There are four login levels for plesk
They are
1) Administrator
2)Client/Reseller
3) Domain owner
4) Email user

Each level has got its own functions


Administrator

This login is used to by hosting administators to manage the server items . Client/reseller,Domain owner,Email user creation can be done by using this account.
Note : We cannot use the root password for login to this account as in Cpanel. To login to this account use
Username : admin
Password : (will be stored in fiel /etc/psa/.psa.shadow )


Client/Reseller

This is the second tier account . Domain owner accounts and Email user accounts can be managed from this account.

Domain owner


Everything related to one domain can be managed by using this account. usually client/reseller creates a Domain owner account.


mail user

This is the fourth tier account. Here users are allowed to manage their mail account. Only mail related functions are allowed here such as sending mails ,seting spam filters etc.
Software componets of plesk.

The following software components are used with plesk.


DNS server : bind
Webserver : Apache
FTP server : proftpd
Mail server : Mysql,mssql,postgresql
IMAP/POP : courier-IMAP
Mailing list: Mailman
Statistical softwares : Webalizer, AWstats


Types of hosting


In plesk, 3 modes of hosting are avaliable
They are
Physical hosting
The domain is actually hosted on that server.
Standard Hosting
Here url is redirected such that browser url will be changed to destination url
Frame forward
Here also redirection takes place. But browser url doesnot change


PSA DATABASE
*****************
Plesk has a database called psa. We can use the administrator username(admin) and password to login to psa database.
>Tables in psa database are
1. Domains
2. Clients
3. db_users
4.db_bases
5. disk_spaces
6.mail
7.lockout
8. web_users


Backup


> To back up all data
/plesk_installation_directory/bin/pleskbackup all
name>
> To back up all user accounts with all users’ sites,
/plesk_installation_directory/bin/pleskbackup clients